
目的
ホームページを作成しているPCは、WindowsPC。作成したHTMLをネットワーク(local)を使ってWebServerへupするために、FTPServerソフトを使用する。CentOSで標準のvsftpdをインストールする。
vsftpd.confの設定
OSインストール時に、vsftpdもインストールされていますが、念のため確認してください。確認方法は、Apacheと同じです。インストールされていなければ、インストールをします。
バージョンは、vsftpd-2.0.5-12.el5_3.1.i386です。
vsftpd.confの設定は、Apacheのhttpd.confと同じようにgeditで行います。
場所は、/etc/vsftpd/vsftpd.confになります。
設定内容は以下の通りです。
追加:青字、変更:赤字で記載します。
#
# The default compiled in settings are fairly paranoid. This sample file
# loosens things up a bit, to make the ftp daemon more usable.
# Please see vsftpd.conf.5 for all compiled in defaults.
#
# READ THIS: This example file is NOT an exhaustive list of vsftpd options.
# Please read the vsftpd.conf.5 manual page to get a full idea of vsftpd's
# capabilities.
#
# Allow anonymous FTP? (Beware - allowed by default if you comment this out).
anonymous_enable=YES→anonymous_enable=NO 12行目
#
# Uncomment this to allow local users to log in.
local_enable=YES
#
# Uncomment this to enable any form of FTP write command.
write_enable=YES
#
# Default umask for local users is 077. You may wish to change this to 022,
# if your users expect that (022 is used by most other ftpd's)
local_umask=022
#
# Uncomment this to allow the anonymous FTP user to upload files. This only
# has an effect if the above global write enable is activated. Also, you will
# obviously need to create a directory writable by the FTP user.
#anon_upload_enable=YES
#
# Uncomment this if you want the anonymous FTP user to be able to create
# new directories.
#anon_mkdir_write_enable=YES
#
# Activate directory messages - messages given to remote users when they
# go into a certain directory.
dirmessage_enable=YES
#
# Activate logging of uploads/downloads.
xferlog_enable=YES
#
# Make sure PORT transfer connections originate from port 20 (ftp-data).
connect_from_port_20=YES
#
# If you want, you can arrange for uploaded anonymous files to be owned by
# a different user. Note! Using "root" for uploaded files is not
# recommended!
#chown_uploads=YES
#chown_username=whoever
#
# You may override where the log file goes if you like. The default is shown
# below.
#xferlog_file=/var/log/vsftpd.log→xferlog_file=/var/log/vsftpd.log 51行目
#
# If you want, you can have your log file in standard ftpd xferlog format
xferlog_std_format=YES
#
# You may change the default value for timing out an idle session.
#idle_session_timeout=600→idle_session_timeout=600 60行目
#
# You may change the default value for timing out a data connection.
data_connection_timeout=120
#
# It is recommended that you define on your system a unique user which the
# ftp server can use as a totally isolated and unprivileged user.
#nopriv_user=ftpsecure
#
# Enable this and the server will recognise asynchronous ABOR requests. Not
# recommended for security (the code is non-trivial). Not enabling it,
# however, may confuse older FTP clients.
#async_abor_enable=YES
#
# By default the server will pretend to allow ASCII mode but in fact ignore
# the request. Turn on the below options to have the server actually do ASCII
# mangling on files when in ASCII mode.
# Beware that on some FTP servers, ASCII support allows a denial of service
# attack (DoS) via the command "SIZE /big/file" in ASCII mode. vsftpd
# predicted this attack and has always been safe, reporting the size of the
# raw file.
# ASCII mangling is a horrible feature of the protocol.
#ascii_upload_enable=YES→ascii_upload_enable=YES 79行目
#ascii_download_enable=YES→ascii_download_enable=YES 80行目
#
# You may fully customise the login banner string:
#ftpd_banner=Welcome to blah FTP service.
#
# You may specify a file of disallowed anonymous e-mail addresses. Apparently
# useful for combatting certain DoS attacks.
#deny_email_enable=YES
# (default follows)
#banned_email_file=/etc/vsftpd/banned_emails
#
# You may specify an explicit list of local users to chroot() to their home
# directory. If chroot_local_user is YES, then this list becomes a list of
# users to NOT chroot().
#chroot_list_enable=YES→chroot_list_enable=YES 94行目
# (default follows)
#chroot_list_file=/etc/vsftpd/chroot_list→chroot_list_file=/etc/vsftpd/chroot_list 96行目
#
# You may activate the "-R" option to the builtin ls. This is disabled by
# default to avoid remote users being able to cause excessive I/O on large
# sites. However, some broken FTP clients such as "ncftp" and "mirror" assume
# the presence of the "-R" option, so there is a strong case for enabling it.
#ls_recurse_enable=YES→ls_recurse_enable=YES 102行目
#
# When "listen" directive is enabled, vsftpd runs in standalone mode and
# listens on IPv4 sockets. This directive cannot be used in conjunction
# with the listen_ipv6 directive.
listen=YES
#
# This directive enables listening on IPv6 sockets. To listen on IPv4 and IPv6
# sockets, you must run two copies of vsftpd whith two configuration files.
# Make sure, that one of the listen options is commented !!
#listen_ipv6=YES
pam_service_name=vsftpd
userlist_enable=YES
tcp_wrappers=YES
設定が終了したら、上書き保存をして終了します。
21番ポートをあける
OSの21番ポートを開きます。今回は、外部からFTPは使用しないのでルータの設定はしません。
user_listの設定
次に、user_listを設定します。このファイルは、ftpができる、できないフォルダを指定します。指定しないと、ユーザとパスワードがわかってしまうとftpクライアントから丸見えになってしまいます。
場所は、/etc/vsftpd/user_listになります。
設定は、geditで行います。方法は、.confと同じです。
デフォルトでは以下のようになっています。#が付いていると、ftpが可能となります。念のため、root以下#を削除します。
ftpを許すユーザをhogehoge許さないユーザをhugahuga、hokohoko、fokafokaとします。
# If userlist_deny=NO, only allow users in this file
# If userlist_deny=YES (default), never allow users in this file, and
# do not even prompt for a password.
# Note that the default vsftpd pam config also checks /etc/vsftpd/ftpusers
# for users that are denied.
#root→root
#bin→bin
#daemon→daemon
#adm→adm
#lp→lp
#sync→sync
#shutdown→shutdown
#halt→halt
#mail→mail
#news→news
#uucp→uupc
#operator→operator
#games→games
#nobody→nobody
hugahuga
#hogehoge
hokohoko
fokafoka
これで、ftpを許すのは、hogehogeだけとなります。
vsftpdの起動
設定が終了したので、vsftpd起動させます。起動方法は、GNOME端末からの方法とGUIからの方法があります。今回は、GUIから行います。
 システムをクリック。
↓
管理をクリック。
↓
サービスをクリック。
↓
rootのパスワードを聞いてくるのでパスワードを入れてOKをクリック。
↓
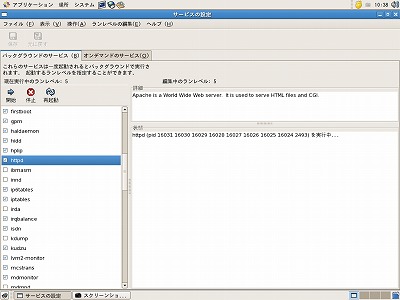
サービスの設定が立ち上がり左の画面が表示されます。左側に各サービスが表示されていてチェックが付いているのが、起動しているソフトです。この中から、"vsftpd"を探します。チェックがなければ、vsftpdをクリックしてチェックをつけて、上にある開始をクリックします。これで、vsftpdは起動します。もし、チェックが付いているときは、そのまま上にある再起動をクリックします。
FTP CLIENT FFFTPの設定
WindowsPC用のFFFTPでFTPServerとのテストを行います。テストは、ローカル(LAN)で行います。まず、FFFTPをダウンロードしてインストールします。以下のURLからダウンロードできます。
http://www2.biglobe.ne.jp/~sota/index.html
インストール終了後、FFFTPを立ち上げて設定します。設定は以下の通りです。
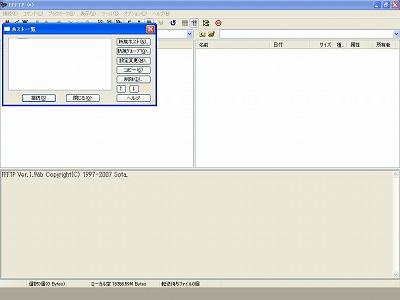 FFFTPのアイコンをクリックすると、左の画面が表示されます。
新規ホストをクリックします。
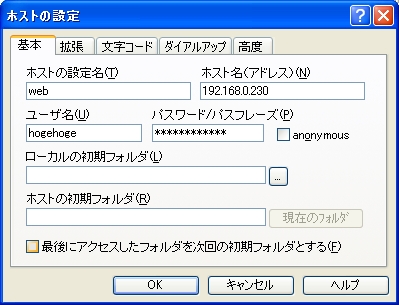 左画面が表示されるので、必要なところを設定します。
ホストの設定名は任意です。わかりやすい名前をつけます。
ホスト名(アドレス)には、ローカルIPを設定します。今回は、ネットワーク設定で192.168.0.230に設定したので、192.168.0.230を入れます。
ユーザー名は、上の設定でhogehogeにしているので、hogehogeを入れます。
パスワード/パスフレーズには、Apacheで設定したhogehogeのパスワードhogehoge2009を入れます。
次に、拡張タブをクリックします。
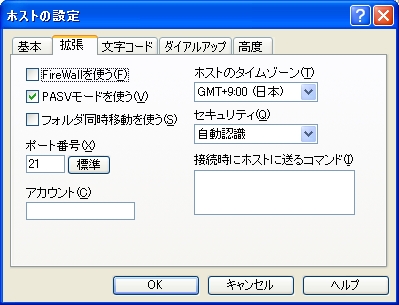 左の画面が表示され、ポート番号が21になっているかを確認し、PASVモードを使うにチェックが付いていることを確認します。PASVにチェックがないとFTPがつながりません。
確認終了後OKをクリックします。
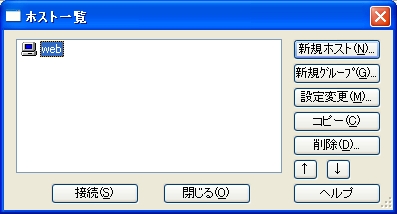 設定は終了したので、左のwebをダブルクリックします。画面右側にwebserverのフォルダ・ファイルが表示されます。