
httpd.confの設定
Server-GUIでインストールをするとApacheはインストールされますが、念のためインストールされているかを確認してください。確認方法は、アプリケーション→ソフトウェアの追加と削除をクリック。rootのパスワードを聞いてくるので、パスワードを入力し、OKをクリックでパッケージマネージャーが開くので、検索でhttpdを検索します。
検索の結果、httpd-2.2.3-22,el5,centos,i386 - Apache HTTP Serverにチェックが付いていればインストールされています。もし、チェックが付いていない場合は、その場でチェックをつけて適用をクリックしてください。インストールが始まります。
Aapcheの設定をします。Apacheの設定ファイルは、httpd.confになります。
場所は、/etc/httpd/conf/httpd.confになります。
今回の設定の条件は以下の通りで行います。
ドメイン名:hogehoge.com
htmlを置くディレクトリ:var/www/html → home/var/html(DocumentRootの変更)
PHP5を使用する。
httpd.confの設定を行います。
一般的には、viエディタを使いますが、今回はgeditというエディターを使って設定します。
アプリケーション→GNOME端末をクリックすると、下のような画面が表示されます。
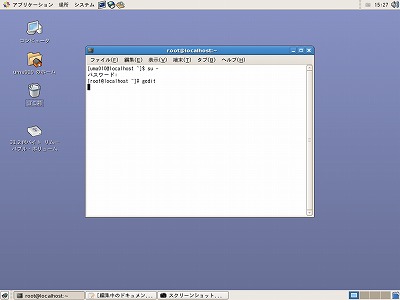 [xxxxxxx@localhost ~]$が表示されます。ここにsu -と入力しEnterKEYを押します。uと-の間にスペースを入れます。
次にrootのパスワードを聞いてくるので、パスワードを入れてEnterKEYを押します。
[root@localhost ~]#と表示されるので、gedit /etc/httpd/conf/httpd.confと入力し、EnterKEYを押します。geditのエディターとhttpd.confが立ち上がるので、設定を行います。
設定内容は以下の通りです。
追加は、青字
変更は、赤字で記載します。なお、全てを記載すると長くなるので一部、カットします。
# This is the main Apache server configuration file. It contains the
# configuration directives that give the server its instructions.
# See <URL:http://httpd.apache.org/docs/2.2/> for detailed information.
# In particular, see
# <URL:http://httpd.apache.org/docs/2.2/mod/directives.html>
# for a discussion of each configuration directive.
LoadModule cache_module modules/mod_cache.so
LoadModule suexec_module modules/mod_suexec.so
LoadModule disk_cache_module modules/mod_disk_cache.so
LoadModule file_cache_module modules/mod_file_cache.so
LoadModule mem_cache_module modules/mod_mem_cache.so
LoadModule cgi_module modules/mod_cgi.so
LoadModule version_module modules/mod_version.so
LoadModule php5_module modules/libphp5.so ←200行目、追加(PHPを使用時必要)
#
# The following modules are not loaded by default:
#
#LoadModule cern_meta_module modules/mod_cern_meta.so
#LoadModule asis_module modules/mod_asis.so
#
# If you wish httpd to run as a different user or group, you must run
# httpd as root initially and it will switch.
#
# User/Group: The name (or #number) of the user/group to run httpd as.
# . On SCO (ODT 3) use "User nouser" and "Group nogroup".
# . On HPUX you may not be able to use shared memory as nobody, and the
# suggested workaround is to create a user www and use that user.
# NOTE that some kernels refuse to setgid(Group) or semctl(IPC_SET)
# when the value of (unsigned)Group is above 60000;
# don't use Group #-1 on these systems!
#
User apache
Group apache
#
# ServerAdmin: Your address, where problems with the server should be
# e-mailed. This address appears on some server-generated pages, such
# as error documents. e.g. admin@your-domain.com
#
ServerAdmin root@localhost→ServerAdmin root@hogehoge.com 251行目
#
# ServerName gives the name and port that the server uses to identify itself.
# This can often be determined automatically, but we recommend you specify
# it explicitly to prevent problems during startup.
#
# If this is not set to valid DNS name for your host, server-generated
# redirections will not work. See also the UseCanonicalName directive.
#
# If your host doesn't have a registered DNS name, enter its IP address here.
# You will have to access it by its address anyway, and this will make
# redirections work in a sensible way.
#
ServerName www.example.com:80→ServerName www.hogehoge.com:80 ←265行目
#
# DocumentRoot: The directory out of which you will serve your
# documents. By default, all requests are taken from this directory, but
# symbolic links and aliases may be used to point to other locations.
#
DocumentRoot "/var/www/html"→"/home/var/html" ←281行目
#
# Each directory to which Apache has access can be configured with respect
# to which services and features are allowed and/or disabled in that
# directory (and its subdirectories).
#
#
# This should be changed to whatever you set DocumentRoot to.
#
<Directory "/var/www/html">→"/home/var/html" ←306行目
#
# DirectoryIndex: sets the file that Apache will serve if a directory
# is requested.
#
# The index.html.var file (a type-map) is used to deliver content-
# negotiated documents. The MultiViews Option can be used for the
# same purpose, but it is much slower.
#
DirectoryIndex index.html index.php index.html.var ←391行目
# Note that if you include a trailing / on fakename then the server will
# require it to be present in the URL. So "/icons" isn't aliased in this
# example, only "/icons/". If the fakename is slash-terminated, then the
# realname must also be slash terminated, and if the fakename omits the
# trailing slash, the realname must also omit it.
#
# We include the /icons/ alias for FancyIndexed directory listings. If you
# do not use FancyIndexing, you may comment this out.
#
Alias /icons/ "/var/www/icons/"→"/home/var/icons/" ←539行目
<Directory "/var/www/icons">→"/home/var/icons" ←541行目
Options Indexes MultiViews
AllowOverride None
Order allow,deny
Allow from all
</Directory>
#
# WebDAV module configuration section.
#
<IfModule mod_dav_fs.c>
# Location of the WebDAV lock database.
DAVLockDB /var/lib/dav/lockdb
</IfModule>
#
# ScriptAlias: This controls which directories contain server scripts.
# ScriptAliases are essentially the same as Aliases, except that
# documents in the realname directory are treated as applications and
# run by the server when requested rather than as documents sent to the client.
# The same rules about trailing "/" apply to ScriptAlias directives as to
# Alias.
#
ScriptAlias /cgi-bin/ "/var/www/cgi-bin/"→"/home/var/cgi-bin/" ←564行目
#
# "/var/www/cgi-bin" should be changed to whatever your ScriptAliased
# CGI directory exists, if you have that configured.
#
<Directory "/var/www/cgi-bin">→"/home/var/cgi-bin" ←570行目
AllowOverride None
Options None
Order allow,deny
Allow from all
</Directory>
# Specify a default language. This means that all data style="float:left;"
# going out without a specific language tag (see below) will
# be marked with this one. You probably do NOT want to set
# this unless you are sure it is correct for all cases.
#
# * It is generally better to not mark a page as
# * being a certain language than marking it with the wrong
# * language!
#
#DefaultLanguage nl→DefaultLanguage ja ←673行目(#をとる)
#
#
# LanguagePriority allows you to give precedence to some languages
# in case of a tie during content negotiation.
#
# Just list the languages in decreasing order of preference. We have
# more or less alphabetized them here. You probably want to change this.
#
LanguagePriority en ca cs da de el eo es et fr he hr it ja ko ltz nl nn no
pl pt pt-BR ru sv zh-CN zh-TW
↑LanguagePriority ja en ca cs da de el eo es et fr he
hr it ja ko ltz nl nn no pl pt pt-BR ru sv zh-CN zh-TW ←731行目(jaを一番前に)
#
# ForceLanguagePriority allows you to serve a result page rather than
# MULTIPLE CHOICES (Prefer) [in case of a tie] or NOT ACCEPTABLE (Fallback)
# [in case no accepted languages matched the available variants]
#
ForceLanguagePriority Prefer Fallback
#
# Specify a default charset for all content served; this enables
# interpretation of all content as UTF-8 by default. To use the
# default browser choice (ISO-8859-1), or to allow the META tags
# in HTML content to override this choice, comment out this
# directive:
#
AddDefaultCharset UTF-8→#AddDefaultCharset UTF-8 ←747行目(#をつける)
#
# AddType allows you to add to or override the MIME configuration
# file mime.types for specific file types.
#
#AddType application/x-tar .tgz
#
# If the AddEncoding directives above are commented-out, then you
# probably should define those extensions to indicate media types:
#
AddType application/x-compress .Z
AddType application/x-gzip .gz .tgz
AddType application/x-httpd-php .php ←769行目(PHP使用時必要)
AddType application/x-httpd-php-source .phps ←770行目(PHP使用時に必要)
# AddHandler allows you to map certain file extensions to "handlers":
# actions unrelated to filetype. These can be either built into the server
# or added with the Action directive (see below)
#
# To use CGI scripts outside of ScriptAliased directories:
# (You will also need to add "ExecCGI" to the "Options" directive.)
#
#AddHandler cgi-script .cgi→AddHandler cgi-script .cgi ←778行目(#をとる)
#
# which allows you to create your own set of files by starting with the
# /var/www/error/include/ files and
# copying them to /your/include/path/, even on a per-VirtualHost basis.
#
Alias /error/ "/var/www/error/"→"/home/var/error/" ←837行目
<IfModule mod_negotiation.c>
<IfModule mod_include.c>
<Directory "/var/www/error">→"/home/var/error" ←841行目
AllowOverride None
Options IncludesNoExec
AddOutputFilter Includes html
AddHandler type-map var
Order allow,deny
Allow from all
LanguagePriority en es de fr
ForceLanguagePriority Prefer Fallback
</Directory>
設定が終了したら、上書き保存を行いgeditを終了します。GNOME端末の画面になりますので、終了したい場合は、exitと入力し、EnterKEY。もう一度exitと入力し、EnterKEY。で終了します。
80番ポートをあける
OSとルータの80番ポートを開きます。設定は機種やメーカーによって違います。また、安価な機種の場合、設定できないものもありるので購入時に確認してください。
ポートの確認
ルータの80番ポートが開いているかは以下のサイトで確認できます。
ポートチェック
DocumentRootの変更
htmlを置くフォルダーがroot権限だと何かと面倒なので、homeフォルダーの配下に作成します。フォルダ名は、上で記載したように、/home/var/htmlにします。
フォルダーをコピーする。
まず、var以下にあるhttp用のフォルダとファイルを名前を変えてコピーします。
コピーの方法は、Windowsの様にコピペではできません。
まず、httpd.confの設定を行ったときと同じようにGNOME端末を立ち上げて、su -の権限で入ります。
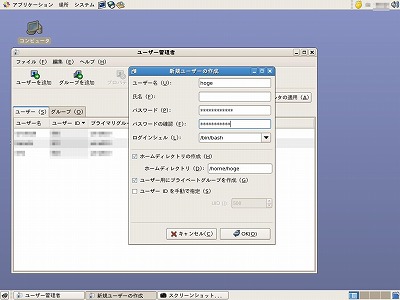
ユーザーを作成する。
これで、必要なものがコピーできました。次に、コピーして作成されたvarにユーザーとグループを割り当てます。コピーしただけでは、権限がrootのままなので使い勝手がよくありません。
まず、ユーザーを作成します。仮にユーザーをhoge、パスワードをhogehoge2009として作成します。
 システムをクリック。
↓
管理をクリック。
↓
ユーザーとグループをクリック。
↓
rootパスワードを聞いてくるのでパスワードを入れてOKをクリック。
↓
ユーザー管理が立ち上がるので
↓
ユーザーの追加をクリック。
↓
新規ユーザーの作成が立ち上がるので、ユーザー名にhogeを入力し、パスワードにhogehoge2009と入力してOKをクリック。このあと、プロパティでグループ名を確認します。今回は、グループ名はhogehogeとします。グループ名は変更できます。
なお、このユーザー名とパスワードはFTPのときに必要になるので簡単な文字列で作成しないようにします。
次に、先ほどコピーしたフォルダの所有者を今作成したユーザーにします。再度、GNOME端末でsu -でrootになります。
これで、/home/varとvar以下のフォルダとファイルは、hogeが所有者となりました。
Apacheを起動させる
設定が終了したので、Apacheを起動させます。起動方法は、GNOME端末からの方法とGUIからの方法があります。今回は、GUIから行います。
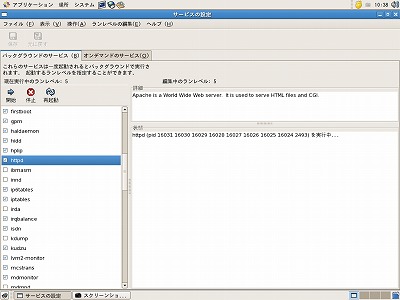 システムをクリック。
↓
管理をクリック。
↓
サービスをクリック。
↓
rootのパスワードを聞いてくるのでパスワードを入れてOKをクリック。
↓
サービスの設定が立ち上がり左の画面が表示されます。左側に各サービスが表示されていてチェックが付いているのが、起動しているソフトです。この中から、"httpd"を探します。チェックがなければ、httpdをクリックしてチェックをつけて、上にある開始をクリックします。これで、Apacheは起動します。もし、チェックが付いているときは、そのまま上にある再起動をクリックします。
これで、設定が反映されたのでFireFox(Webブラウザ)を立ち上げて、アドレスバーにhttp://localhostと入力して、EnterKEYを押してください。無事ApacheのHTMLが立ち上がれば設定は無事終了です。